Help
Site Help
-
How do I log in
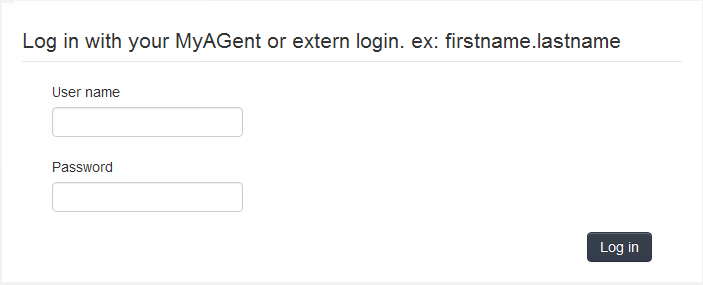
When prompted to log in you will see the following page:
-
For Government of Alberta Employees:
Enter your MyAGent login (e.g firstname.lastname) and password and click the "log in" button
-
For Users with External GoA access:
Enter your External Account login (e.g. firstname.lastname) and password and click the "log in" button
The session will expire after a period of inactivity between 1.5 to 3 days.
Note: It is recommended that you Log out if accessing our site from a shared or public computer when you are done accessing our site. This will prevent others from accessing the site as you.

-
For Government of Alberta Employees:
Issues Opening PDF Files
-
PDF contents do not load in Edge
When using Edge browser, you may encounter issue where your browser is trying to open a form and instead you see a "Please Wait..." page displayed. Follow the procedure below to configure Edge broswer to not open PDFs.
- Open Edge browser
- In URL address enter edge://settings/content/pdfDocuments and hit Enter
- Turn On the setting Always download PDF files
If this does not correct your issue see the help article Check/Configure default System PDF viewer
-
PDF contents do not load in Chrome
When using Chrome browser, you may encounter issue where your browser is trying to open a form and instead you see a "Please Wait..." page displayed. Follow the procedure below to configure Chrome broswer to not open PDFs.
- Open Chrome browser
- In URL address enter chrome://settings/content/pdfDocuments and hit Enter
- Turn On the setting Download PDFs
If this does not correct your issue see the help article Check/Configure default System PDF viewer
-
PDF contents do not load in Firefox
When using Firefox browser, you may encounter issue where your browser is trying to open a form and instead you see a "Please Wait..." page displayed. Follow the procedure below to configure Firefox broswer to not open PDFs.
- Open Firefox browser
- In URL address enter about:preferences#general and hit Enter
- Find the section Applications and find Portable Document Format (PDF)
- In the Action drop down select Use other... and in the Select Help Application dialog choose Adobe Acrobat Reader DC
-
PDF contents do not load in Safari
When using Safari browser, you may encounter issue where your browser is trying to open a form and instead you see a "Please Wait..." page displayed. Follow the procedures Safari on Mac OS and Safari on Mac or Windows - browser preferences here: https://helpx.adobe.com/acrobat/kb/pdf-browser-plugin-configuration.html
-
Check/Configure default System PDF viewer
- Open a PDF file from your computer
- If the file opens in Adobe Acrobat Reader DC then your default app is properly configured.
- If the file does not open in Adobe Acrobat Reader DC application then your system default is not set properly
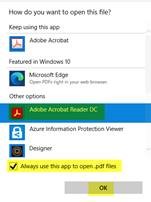
- Right-click on the PDF file you tried to open and choose Open with and in the secondary menu choose Choose another app
- In the How do you want to open this file? popup
- Find and select Adobe Acrobat Reader DC
- Ensure that the option to Always use this app to open .pdf files is checked
- click OK
-
PDF contents do not load in Reader XI
After upgrading to Reader XI version 11.0.3, you may find that PDF content does not load as it did before. This update uses an Adobe feature that requires your action prior to loading or using some content.
When opening PDFs no form content will load:
- The user can click the “Enable all Features” button they see in the notification banner as below:

Optional Configuration:
- For those who spend a lot of time filling out GoA forms, you can disable this feature for downloaded PDFs through the following procedure.
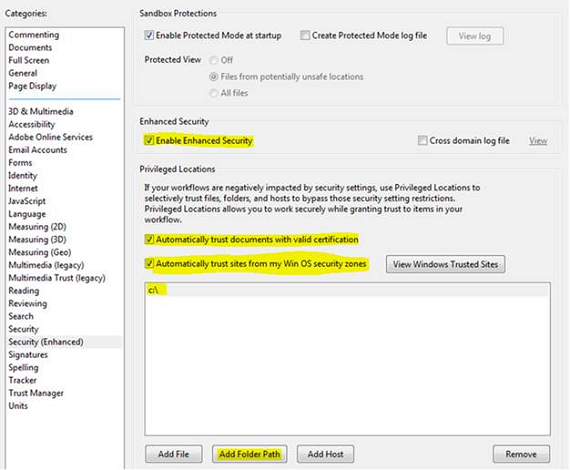
- Open Adobe Reader.
- Go to Edit > Preferences
- Go to the category Security (Enhanced) and set the security as highlighted below.
- To enable c:\ as a Privileged Location click on Add Folder Path, then click on Computer then select the Local Drive (C:) location
*Warning* You must always be aware of the source of PDFs when opening them. If you do not know or trust the source of a PDF you should always treat it with suspicion and not open it.
PDF (Adobe Reader) Forms Help
-
Software Requirements
All of the forms on our websites are PDF (portable document format), unless otherwise indicated. These forms are built to be accessed with Adobe® Acrobat® Reader™. They are best viewed using Adobe Reader 9 or higher. Note: To avoid using outdated versions of any form on this site, we recommend that you do not save a copy locally, please use the site to obtain the latest version of every form.
-
Moving within a form
Use the"Tab" key or your mouse to navigate from field to field.
-
Changing your data
To replace data you've already entered in a field, place your cursor within the field and then double click. This "selects" the existing data, which you can then adjust or replace. We have placed a ‘Reset’ button on most forms, this button can be used to clear the data from all fields and start over. The "Reset" button will be located at the bottom of the form.
-
Multi-page forms
Where data fields are repeated on multi-page forms, you are only required to type the information once and the data will automatically populate to the same fields on all applicable pages.
-
Multi-line fields
Some fields, for instance, the address field on some forms have room for more than one line of text.
- To move to the next line within a field, hit "Enter."
- When you've finished typing in the field, hit "Tab" to move to the next field.
-
Forms that have calculations
Some forms have fields that perform calculations based on the amounts you enter. When you enter data in two fields that are to be added together, the form automatically calculates the total and inserts it in the appropriate field. You are responsible for the completeness and accuracy of any information submitted on fillable forms that perform calculations. Please double-check all data that you enter!
-
Fields with a limited number of characters
Some fields have formatting applied to them which limit the maximum number of characters you can enter. (e.g. a maximum of nine characters can be entered in the field asking for a social insurance number). Any field that has formatting will not accept any dashes or spaces.
-
Formatted fields
Dates: Unless otherwise specified on an individual form, all dates must be entered in the format yyyy/mm/dd (for example, "2000/03/03" means March 3, 2000).
Dollar amounts: You must manually enter the decimal point in dollar amounts that include cents. If you don't manually enter a decimal point, the system will automatically insert one after the final digit you entered.
Phone numbers: You need only type the numbers as the field is pre-formatted. Avoid typing any (brackets) or – dashes.
Signatures:
- A fillable form that does not have a digital signature will require you to sign the form by hand after you've completed and printed the form. The form won't let you enter any electronic data in the signature field.
-
A fillable form that does have a digital signature will allow you to tab into the field and apply your electronic signature. Please note that once you have signed a form with a digital signature, there will be some (if not all) information on the form that is locked and cannot be manipulated. Once the form is digitally signed you can submit to the appropriate area electronically by attaching it to an email.
-
Special links
When using a fillable form, we strive to put the information and or forms you require at your fingertips, therefore, you may see buttons which can link you to additional information, forms or publications.
-
To Create, Use and Validate a Self-Signed Digital ID
Please refer to our Digital Signature document.
XDP (HTML) Forms Help
-
How do I complete a Form and Submit
HTML forms require that users Print (Sign where applicable) and Submit the form in person or through mail or email to the Program area as described on the form (submission instructions).
Once the form is completed, you must press the "Get Print Friendly PDF" button at the top-right of the page, or the "Print Version" button on the bottom of the form.
 OR
OR

This will create and open a PDF version of your filled in form in a new browser tab. You must then print or save this PDF using the PDF viewer menu or controls on the screen.

Note: Most of the HTML forms require ink signature(s). This requires the form be printed to paper.
-
How do I Save/Load my Form Data
HTML forms offer the ability to Save/Load your form data. This allows you to save the form fields and return to the form at a later date and complete the form if required.
To save your partially completed form, click on the save button at the top-right of the page or on the "Save" button at the bottom of the form.
 OR
OR

You will be asked to provide your email address prior to saving. Once saved, you will be shown a message that will contain a link to your saved form.
Note: This content is saved to the server and will expire in 15 days.
You will also recieve this information along with a read only copy of your form through email to the email address provided.
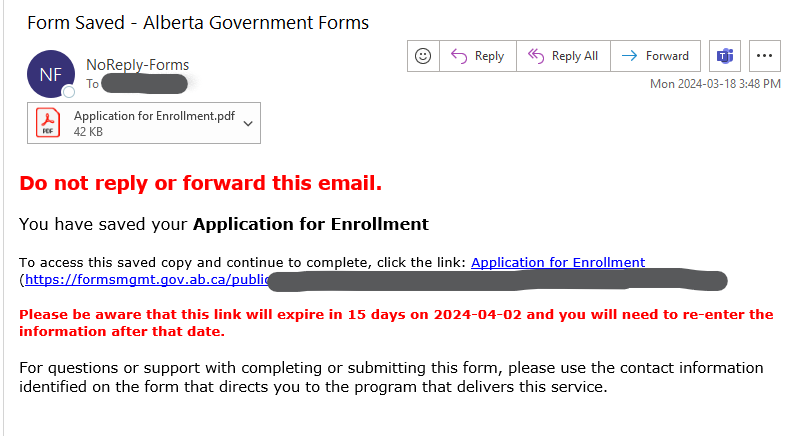
To load previously saved content, click on the link in the email sent to you when you saved the form. This will open the form in your browser, load your saved data and allow you to continue from that point.
-
How do I Save in Safari
The Save Functionality on HTML forms will be blocked by default in Safari and Safari Mobile as a popup preventing the use of this feature. To enable this functionality you must follow these steps:
Safari (Mac):
From the Safari menu go to Preferences > Websites > Pop-up Windows
Find formsmgmt.gov.ab.ca and set it to Allow
Safari (Mobile):
In Safari Mobile you can only turn on/off the popup blocker for all websites. It is recommended that you turn the pop-up blocker temporarily and turn it back on once your form is saved.Open Settings and navigate to Safari
In the General settings of Safari turn off the Block Pop-ups setting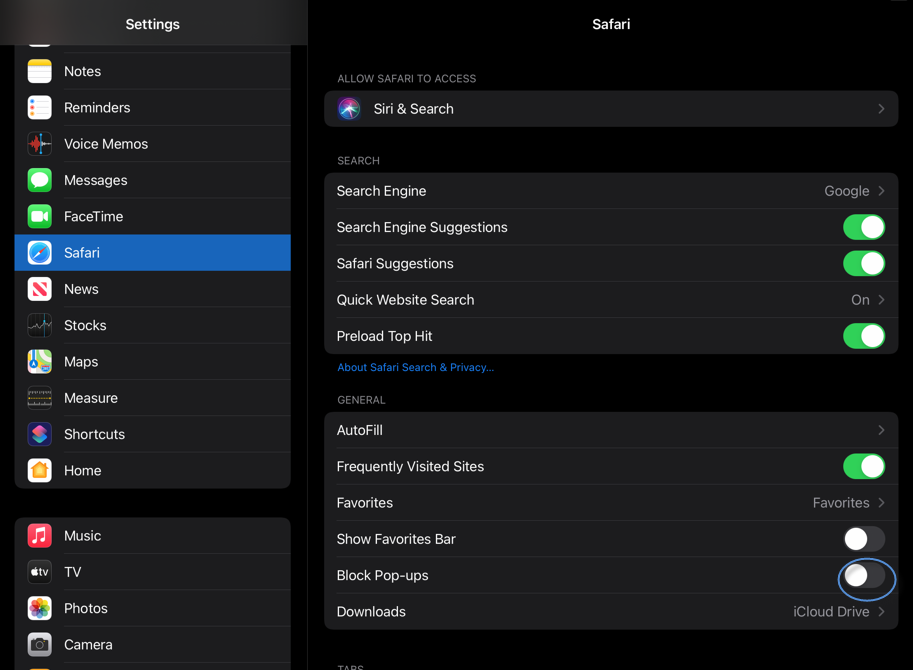
-
How do I Get Help
Common Help answers can be found on this page under the XDP (HTML) Forms Help topic.
This page can be reached from the top-right of the page via the "Help" button.

Additional help can be requested through our GOA.Forms@gov.ab.ca mailbox.
Word 2007 or Higher Template Help
-
Word 2007 or Higher Template Help
All Word templates are Word 2007 compatible. Most templates may also be used with Word 2003. See the Word 2003 Template Help if you are using Word versions 2003 or lower. Word Templates - Requirements In order to use web-based Word templates, you must ensure the macro security in Word is set to enable all macros before you download the form. If your macro security is set to anything thing else, you will not be able to run the macro to complete the form.
To check your level of security for macros, follow these steps:
- Click the Microsoft Office Button, and then click Word Options.
- Click Trust Center, Click Trust Center Settings, and then click Macro Settings.
- Set the security to Enable all macros.
- Click the Microsoft Office Button, and then click Word Options.
- Click on Advanced on the left and scroll down until you can see Show document content.
- Under the Show document content, ensure View field codes instead of their values is de-selected.
-
Word Templates - Formats
Word templates will appear in one of two ways on the web. The most common will be templates with user forms or a series of dialogue boxes or windows that you type or select items from. Some templates may be created using form fields that you tab through to complete. Once you access a form from the web the first thing you should see at the top of the form is: Double Click HERE To Start To complete a template with user forms:
- Double click on the word HERE to enable the macro and bring up the first user form or message box.
- A dialogue box will appear in which to select a choice. Complete the required information and click on OK to proceed to the next dialogue box. In some cases, you will be typing text; in other cases, you will be selecting one or more options from a pre-determined list. (Where possible, the information you see in the dialogue box will match the actual contents of the form.) [Tip for keyboard users: the Tab key moves between fields or options; the Enter key takes the place of clicking on OK; the Spacebar selects an option. If a word has a character underlined (e.g. OK or Cancel), press the Alt Key and the letter to make the selection.]
- Once you have completed the form, you can edit, save and print your file as you would any Word document. When you save the document, you will only have the "Save As" option available to you. You will not be able to change the master template on the web.
- Double click on the word HERE to enable the macro and the cursor will go to the first form field. Type the required information, and press the Tab key to move to the next field in the document. Continue using the Tab key to type and move through the template. If you are presented with a check-box, simply press the "x" on your keyboard to select an item. If you are presented with a drop-down list, click on the drop-down arrow on the right-hand side of the list, and select the appropriate item from the list.
- Once you have completed the form, you can edit, save and print your file as you would any Word document. When you save the document, you will only have the "Save As" option available to you. You will not be able to change the master template on the web.
-
Additional Information
NOTE: IT IS NOT RECOMMENDED that you re-use a previously saved form. If a form has changed, and you use an older version, this form may not be accepted, especially if it is a court or regulated form. In the Word templates you may find some useful functions available to you. For Example:
- Some fields may be pre-formatted for you: e.g. maximum number of characters required for a field; if window envelopes are being used, the maximum number of address lines allowed; date formats, etc.
- If a form requires calculations, you may find a prompt: Double-click on UPDATE to calculate your totals . By double clicking on the word UPDATE, your calculations will be updated, provided you have not typed in the cells that have a formula.
Word 2003 Template Help
-
Word Templates - Requirements
All Word templates are Word 2003 compatible. Most templates may also be used with Word 2000. But if you’re working with Word 2007 or higher please see the Word 2007 template help section above. Word Templates - Requirements In order to use web-based Word templates, you must ensure the macro security in Word is set to Medium or Low before you download the form. If your macro security is set to High, you will receive the following warning message: "The macros in this form are disabled." You will not be able to run the macro to complete the form.
To check your level of security for macros, follow these steps:- Select Tools, Macro, and Security.
- Select the Security Level tab
- Set the security to either Medium or Low.
- Select Tools, Options, and the View tab.
- Under the Show category on the View tab, ensure Field Codes is de-selected.
- Double click on the word HERE to enable the macro and bring up the first user form or message box.
- A dialogue box will appear in which to select a choice. Complete the required information and click on OK to proceed to the next dialogue box. In some cases, you will be typing text; in other cases, you will be selecting one or more options from a pre-determined list. (Where possible, the information you see in the dialogue box will match the actual contents of the form.) [Tip for keyboard users: the Tab key moves between fields or options; the Enter key takes the place of clicking on OK; the Spacebar selects an option. If a word has a character underlined (e.g. OK or Cancel), press the Alt Key and the letter to make the selection.]
- Once you have completed the form, you can edit, save and print your file as you would any Word document. When you save the document, you will only have the "Save As" option available to you. You will not be able to change the master template on the web.
- Double click on the word HERE to enable the macro and the cursor will go to the first form field. Type the required information, and press the Tab key to move to the next field in the document. Continue using the Tab key to type and move through the template. If you are presented with a check-box, simply press the "x" on your keyboard to select an item. If you are presented with a drop-down list, click on the drop-down arrow on the right-hand side of the list, and select the appropriate item from the list.
- Once you have completed the form, you can edit, save and print your file as you would any Word document. When you save the document, you will only have the "Save As" option available to you. You will not be able to change the master template on the web.
-
Additional Information
NOTE: IT IS NOT RECOMMENDED that you re-use a previously saved form. If a form has changed, and you use an older version, this form may not be accepted, especially if it is a court or regulated form. In the Word templates you may find some useful functions available to you. For Example:
- Some fields may be pre-formatted for you: e.g. maximum number of characters required for a field; if window envelopes are being used, the maximum number of address lines allowed; date formats, etc.
- If a form requires calculations, you may find a prompt: Double-click on UPDATE to calculate your totals . By double clicking on the word UPDATE, your calculations will be updated, provided you have not typed in the cells that have a formula.
Extern Accounts (RCMP, Police, Fire Chiefs, Peace Officers, etc.)
-
Account Creation
If you do not have an account but require access to the GoA Form Repository to access Justice and Solicitor General forms email: JSG IMT Support Desk to request that an account be created for you to access the GoA Form Repository
Note: only verified RCMP, Police, Peace Officers, etc., are granted accounts
- Account Maintenance